The Basics of Collaborating on Github
Github provides an incredible platform for collaborating on software projects. Features such as forks, pull-requests, issues, and wikis make Github a flexible tool suitable for various workflows. This tutorial will provide an introduction to collaborating on Github and highlight different options for maximizing productivity.
Adding Collaborators to a Repository
On Github, a collaborator is someone who has read/write access to a repository. This means they have the ability to make changes to the repository's codebase, push any changes to Github, as well as accept pull requests.
For most projects, it is often best to add team members as collaborators. However, there are some cases, such as with large open-source projects, where collaboration can still take place even if the person contributing code is not listed as an official collaborator.
In these cases, the way to contribute to a project is to fork its repository, make any changes and then submit a pull request. The project's owner or one of the collaborators can then decide whether to accept the pull request or not.
Working with pull requests will be covered later. Right now, let's cover the process for adding collaborators to a repository.
How to add collaborators:
- From the repository's main page, click on the settings tab.

- Click on Collaborators from the left sidebar.
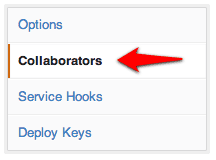
- Enter in the usernames of any collaborators you would like to add to a
project and click the add button.

Deciding on a Workflow
After setting up a project's collaborators, it's important to come to an agreed upon workflow. The main purpose of the workflow is to detail how to structure and work with branches, to decide how and when to push to master, as well as decide whether to utilize pull requests, and if so, how to do so. From this, a multitude of workflow options emerge. Two popular, established choices are:
Git-Flow
Git-Flow uses a multiple branch strategy to section off work into appropriate branches, such as a branch for development, one for hotfixes, another for releases, and one for features. To manage all of these various branches, strict rules are enforced about where and how to merge, push or pull. Given the complex nature of this workflow, developers often use a helper script to make sure they are following the process correctly. For most small projects, Git-Flow may be overly strict and complicated to the point that it interferes with productivity.
Github Flow
Github Flow is the workflow used by Github. It is much simpler than Git-flow, and is built around the following basic premises:
- Master is always deployable and should be kept clean.
- Always work on small branches.
- When you need feedback or help, or you think the branch is ready for merging, open a pull request.
That's it. One of the advantages of this workflow is its simplicity and clarity. Since pull requests are utilized as a sort of code review, developers are able to maintain quality code while being kept in the loop about what features are being actively developed.
For a more detailed explanation of Github Flow in action, check out Zach Holman's talk, "How Github Uses Github to Build Github" below:
Suggested Workflow Rules
Whatever workflow you choose, there are certain rules that should almost always be employed. They include:
- Don't work on master. Master should always be kept clean and be ready to deployed. Use whatever other workflow you need to ensure that the code in master is always ready to be deployed.
- Keep commits small. Large commits can be overwhelming to go through and understand. By keeping commits small, you make changes intelligible. In addition, small commits make it much easier to track down problems when something breaks.
- Be descriptive with your commit messages. Commit messages should clearly articulate what changes the commit introduces. Clarity in commit messages makes it much easier to navigate through the history of messages and find the relevant commit.
- Whenever possible, use descriptive names for branches. Succinct branch names makes it easier for your team members to know what features you are working on. In addition, taking the time to properly name your branch can provide focus for what you should actually be working on.
Pull Requests
Pull Requests are not just limited to forked repositories, but can also be used between branches on the same project. This means that if you are a collaborator on a project, you can work on a feature branch, and then open a pull request whenever you need feedback or help, or you think the branch is ready for merging into master. Once the pull request has been opened, other collaborators on the project can review your code, and provide feedback or ideas.
Pull requests can be opened even if your code is not ready to be merged. This is one of the amazing features about pull requests. It provides a great platform where code can be reviewed and improved upon. If you find yourself stuck with a bit of code, submit a pull request and ask for help. Then once it's been fixed and everything looks good, the pull request can be approved and merged into master.
There are several benefits to this process. First, since code is reviewed before being merged into master, the quality of code is kept high. In addition, pull requests make code changes transparent thereby keeping all team members up to date of any changes. Lastly, pull requests provide a great jumping off point for fleshing out a feature or making code right.
If you've never submitted a pull request, follow along with the pictures to see how it works in action.
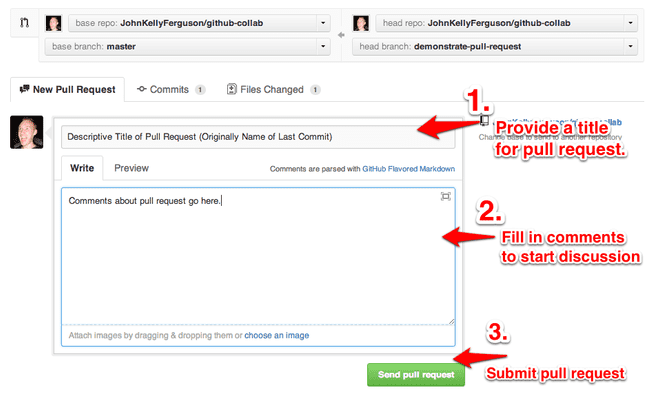
From the repository page, click on the pull request button.

Select the branch that will be the source of the pull request and its destination.

Enter in a title for the pull request, fill in some comments and submit it.
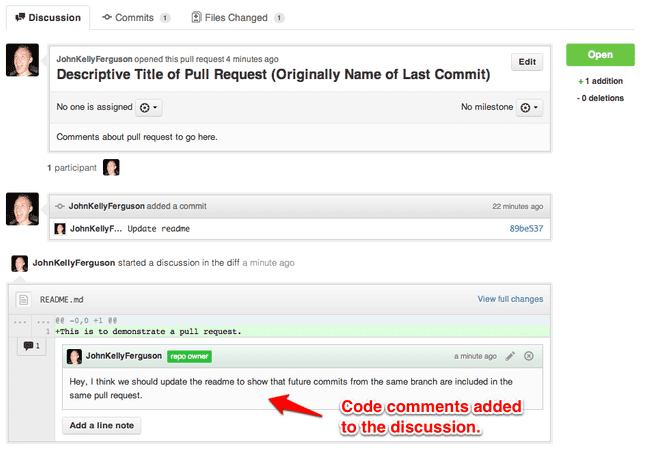
This is what your submitted pull request will look like.
(Notice the three main tabs: Discussion, Commits, Files Changed.)
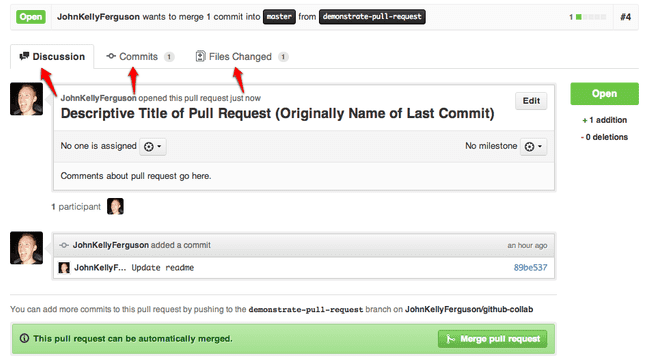
The commits tab lists all the commits. You can click on the link to any commit to see it in detail.

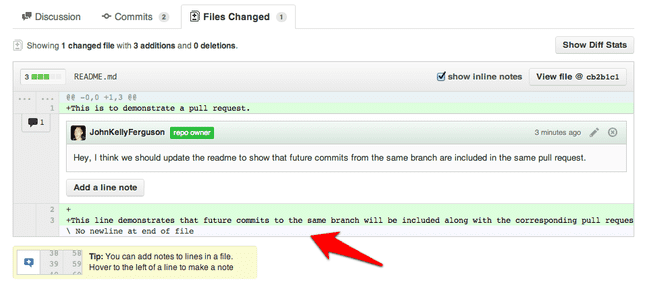
The files changed tab shows all the code that has changed.
(You can add inline comments to the code by clicking on the blue plus button
that appears when you move your mouse near the line numbers.)

Comments appear in the Files Changed section as well as in the Discussion area.
Any future commits from the same branch pushed to github will be included with the pull request.
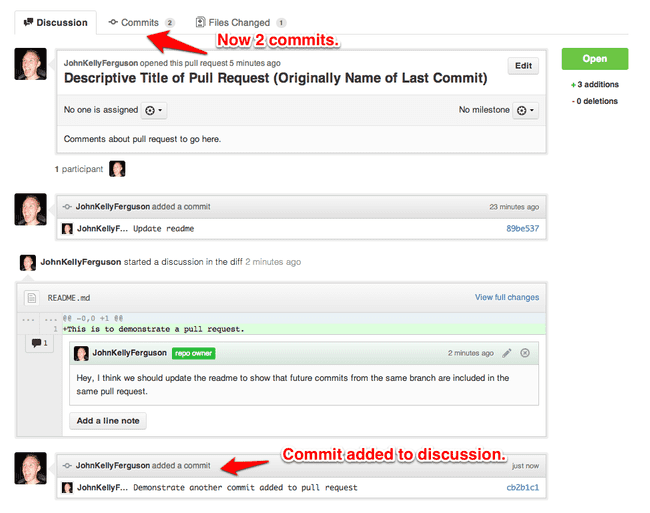
The commits tab will include the new commit.

The Files changed tab will also include the code from the new commit.
The entire Github pull request system provides an incredible way to review and discuss code.