When deciding whether to use a gem during Rails Development, the questions you should be asking yourself are: "Will this gem make me more efficient?", "Will it make me more productive?", or "Will it enable me to make better decisions?" If the answer to any of these questions is yes, then you should add that gem to your Gemfile.
Now, of course, this is a very different process than what goes into deciding whether to use a gem outside of your development environment. In those situations, you are making decisions about the design of the app and its infrastructure. Those types of decisions have much more far-reaching consequences. Because of this, you have to take into consideration things like, "Is this gem flexible and will it be able to adapt to the evolving demands of our application?" or "How difficult would it be to roll our own solution?" and "Is this gem being actively maintained and supported?"
However, these concerns become much less important when figuring out your development process. This is because it is a question of workflow and not one of application design. A workflow can adapt and evolve more easily than the structure of your app. As a consequence, development gems have a much more modular quality to them. They can easily be added in or taken out without affecting the rest of your app. However, this is not true for gems outside of development. As an example, let's say you have decided to use Devise as your authentication solution. If at some point in the future, you decide you no longer want to use Devise, you can't just remove it from your Gemfile and expect things to work. Much of the app would have to be changed to accomodate this change while still providing the same functionality. However, if you are using a gem like xray-rails in development, you can add it or remove it as you please with no far-reaching implications.
I use quite a few gems as a default during Rails development and testing. Instead of explaining all of them, I thought it'd be best to cover my five favorites.
5. quiet_assets
quiet_assets does one thing and does it well: it turns off all of the noisy Rails asset_pipeline message that show up in your development log.
Before installing quiet_assets, you may find that a simple web request will produce something like the following in your Rails server log:
Started GET "/" for 127.0.0.1 at 2013-10-16 16:32:29 -0400
  ActiveRecord::SchemaMigration Load (2.3ms)  SELECT "schema_migrations".* FROM "schema_migrations"
Processing by SessionsController#new as HTML
  Rendered sessions/_form.html.haml (92.0ms)
  Rendered sessions/new.html.haml within layouts/application (100.6ms)
  Rendered shared/_nav.html.haml (2.5ms)
Completed 200 OK in 312ms (Views: 244.0ms | ActiveRecord: 3.2ms)
Started GET "/assets/application.css?body=1" for 127.0.0.1 at 2013-10-16 16:32:31 -0400
Started GET "/assets/scaffolds.css?body=1" for 127.0.0.1 at 2013-10-16 16:32:31 -0400
Started GET "/assets/sessions.css?body=1" for 127.0.0.1 at 2013-10-16 16:32:31 -0400
Started GET "/assets/users.css?body=1" for 127.0.0.1 at 2013-10-16 16:32:31 -0400
Started GET "/assets/jquery.js?body=1" for 127.0.0.1 at 2013-10-16 16:32:31 -0400
Started GET "/assets/xray.js?body=1" for 127.0.0.1 at 2013-10-16 16:32:31 -0400
Started GET "/assets/jquery_ujs.js?body=1" for 127.0.0.1 at 2013-10-16 16:32:31 -0400
Started GET "/assets/turbolinks.js?body=1" for 127.0.0.1 at 2013-10-16 16:32:31 -0400
Started GET "/assets/xray.css?body=1" for 127.0.0.1 at 2013-10-16 16:32:31 -0400
Started GET "/assets/sessions.js?body=1" for 127.0.0.1 at 2013-10-16 16:32:31 -0400
Started GET "/assets/users.js?body=1" for 127.0.0.1 at 2013-10-16 16:32:31 -0400
Started GET "/assets/application.js?body=1" for 127.0.0.1 at 2013-10-16 16:32:31 -0400
After installing quiet_assets, the output will be much more manageable and look like the following:
Started GET "/" for 127.0.0.1 at 2013-10-16 16:35:15 -0400
  ActiveRecord::SchemaMigration Load (1.4ms)  SELECT "schema_migrations".* FROM "schema_migrations"
Processing by SessionsController#new as HTML
  Rendered sessions/_form.html.haml (91.2ms)
  Rendered sessions/new.html.haml within layouts/application (98.6ms)
  Rendered shared/_nav.html.haml (2.2ms)
Completed 200 OK in 285ms (Views: 225.3ms | ActiveRecord: 2.6ms)
The result is that it's now much easier to track things down in your log, like SQL queries or ajax requests.
4. terminal-notifier-guard
terminal-notifier-guard
is a sweet little plugin for Guard. I decided
to include it in this list instead of Guard since Guard is so commonly used.
If you are not familiar with Guard, it's a command line tool used by Ruby
developers to "easily handle events on file system modifications." What this
means is that Guard can be configured to monitor files for changes. When a file
changes, Guard can trigger certain actions, such as automatically running the
corresponding Rspec tests. In order for Guard to automatically run those Rspec
tests, you'll need the guard-rspec
plugin. There are many other plugins available that all do different things.
A full list can be seen here.
One such plugin that works in conjunction with guard-rspec is
terminal-notifier-guard.
What terminal-notifier-guard does is simple: it displays a system
notifications in OS X 10.8 telling you the result whenever guard runs. The
notification looks like this:

This can be particularly nice if you are working on a small screen or laptop. In that case, you don't have to ALT+TAB into Terminal to see the results of your tests and can just look at your system notification. Of course, it's also good if you are working on a setup with a bigger monitor(s).
To use terminal-notifier-guard, you simply have to add it to your Gemfile and be using OS X 10.8. If you are using a different OS, then there are other Guard notification plugins that will work for your system, a full list of which is here.
If you'd like to learn more about Guard, check out this RailsCast.
3. xray-rails
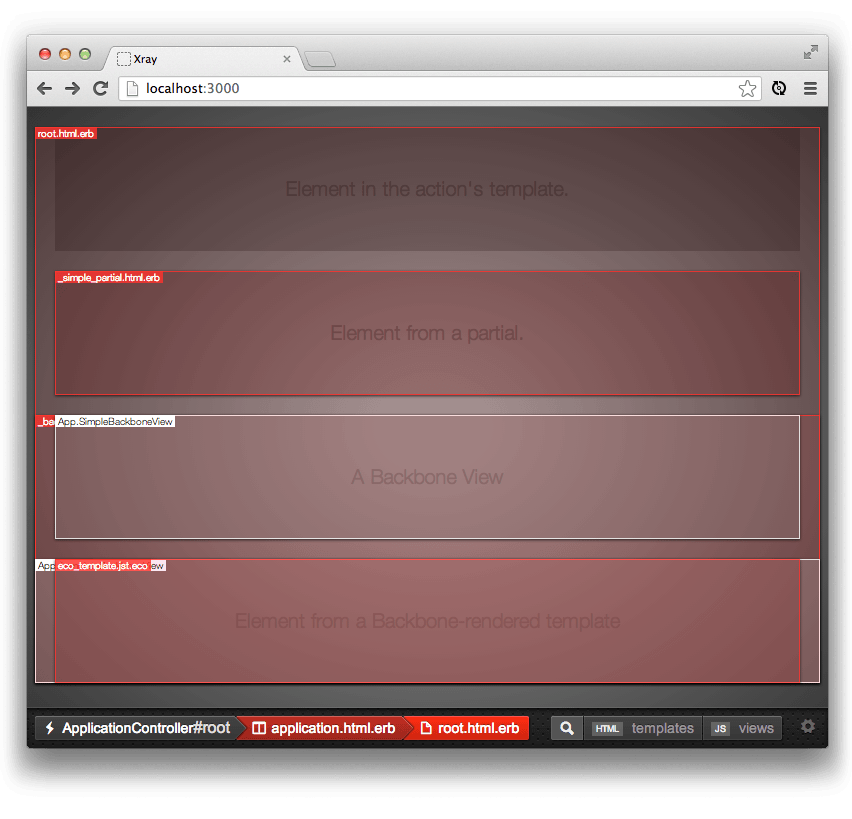
xray-rails is the most underused and
underrated gem on this list. xray-rails allows you to see which files are
being rendered in your view. So, if you are looking at one of your site's pages
on your local machine, you can use the keyboard shortcut cmd + shift + x
(on OS X) or ctrl + shift + x to see all of the partials and other files
being rendered in your view. The result of which looks like this.

From there, you can click on any of the overlays to open the corresponding file in your text editor. xray-rails sets Sublime Text as the default editor but can easily be configured to work with your text editor of choice.
Installing xray-rails is simple. Just add it to your Gemfile:
group :development do
  gem 'xray-rails'
end
Then bundle and delete your cached assets:
$ bundle && rm -rf tmp/cache/assets
Restart your app and you're ready to go.
2. debugger
debugger is a great way to get inside
of your code while it executes and see what's really going on. The gem is
well-named as its best use case is for, appropriately enough, debugging code.
To use debugger, simply place a debugger inside one of the methods that you
want to debug. When that line of code is executed, you will be transported into
a terminal session inside of the block of code. I find this to be really helpful
and use it often when working with Rails, particularly when trying to figure out
issues with a controller. I'll explain with an example.
In the code below, a user is being created in the UsersController using the create action. There are different user types, and depending on the type of user that is being created, that user will be redirected to a particular path.
Now, let's say for some reason, users are not being directed to the appropriate
path based upon their type. This is a situation where I might use debugger to
dig into the code and see what's going on. In this example, I would place the
debugger after setting the @user instance variable. You can see it in the code
below:
class UsersController < ApplicationController
  def create
    @user = User.new(params[:user])
    debugger # this is a good spot to put the debugger
    if @user.save
      session[:user_id] = @user.id
      if @user.is_buyer? || @user.is_agent?
        redirect_to new_wanted_listing_path
      elsif @user.is_homeowner?
        redirect_to new_claim_path
      end
    else
      render 'new', notice: 'Sorry, an error occured. Please complete the form again'
    end
  end
 end
Then, when the create action is triggered, I would be put inside of a debugger session starting where the debugger is placed. I could then move through the code line by line and follow the logical flow to see where things are going wrong.
In addition to regular debugger, I may choose to use a tool like pry instead. To learn more about pry, check out my previous blog post, "Five Ways to Get More Out of Pry".
One plugin which I did not mention in that blog post is
pry-byebug, which adds
debugger like functionality to pry, meaning you can place a binding.pry in
your code and move through it just as you would with debugger. I use both
debugger and pry-byebug when working with Rails and have included them in
my default Gemfile at the beginning of this post.
If you'd like to learn more about using debugger in Rails, check out the following RailsCast.
1. better_errors
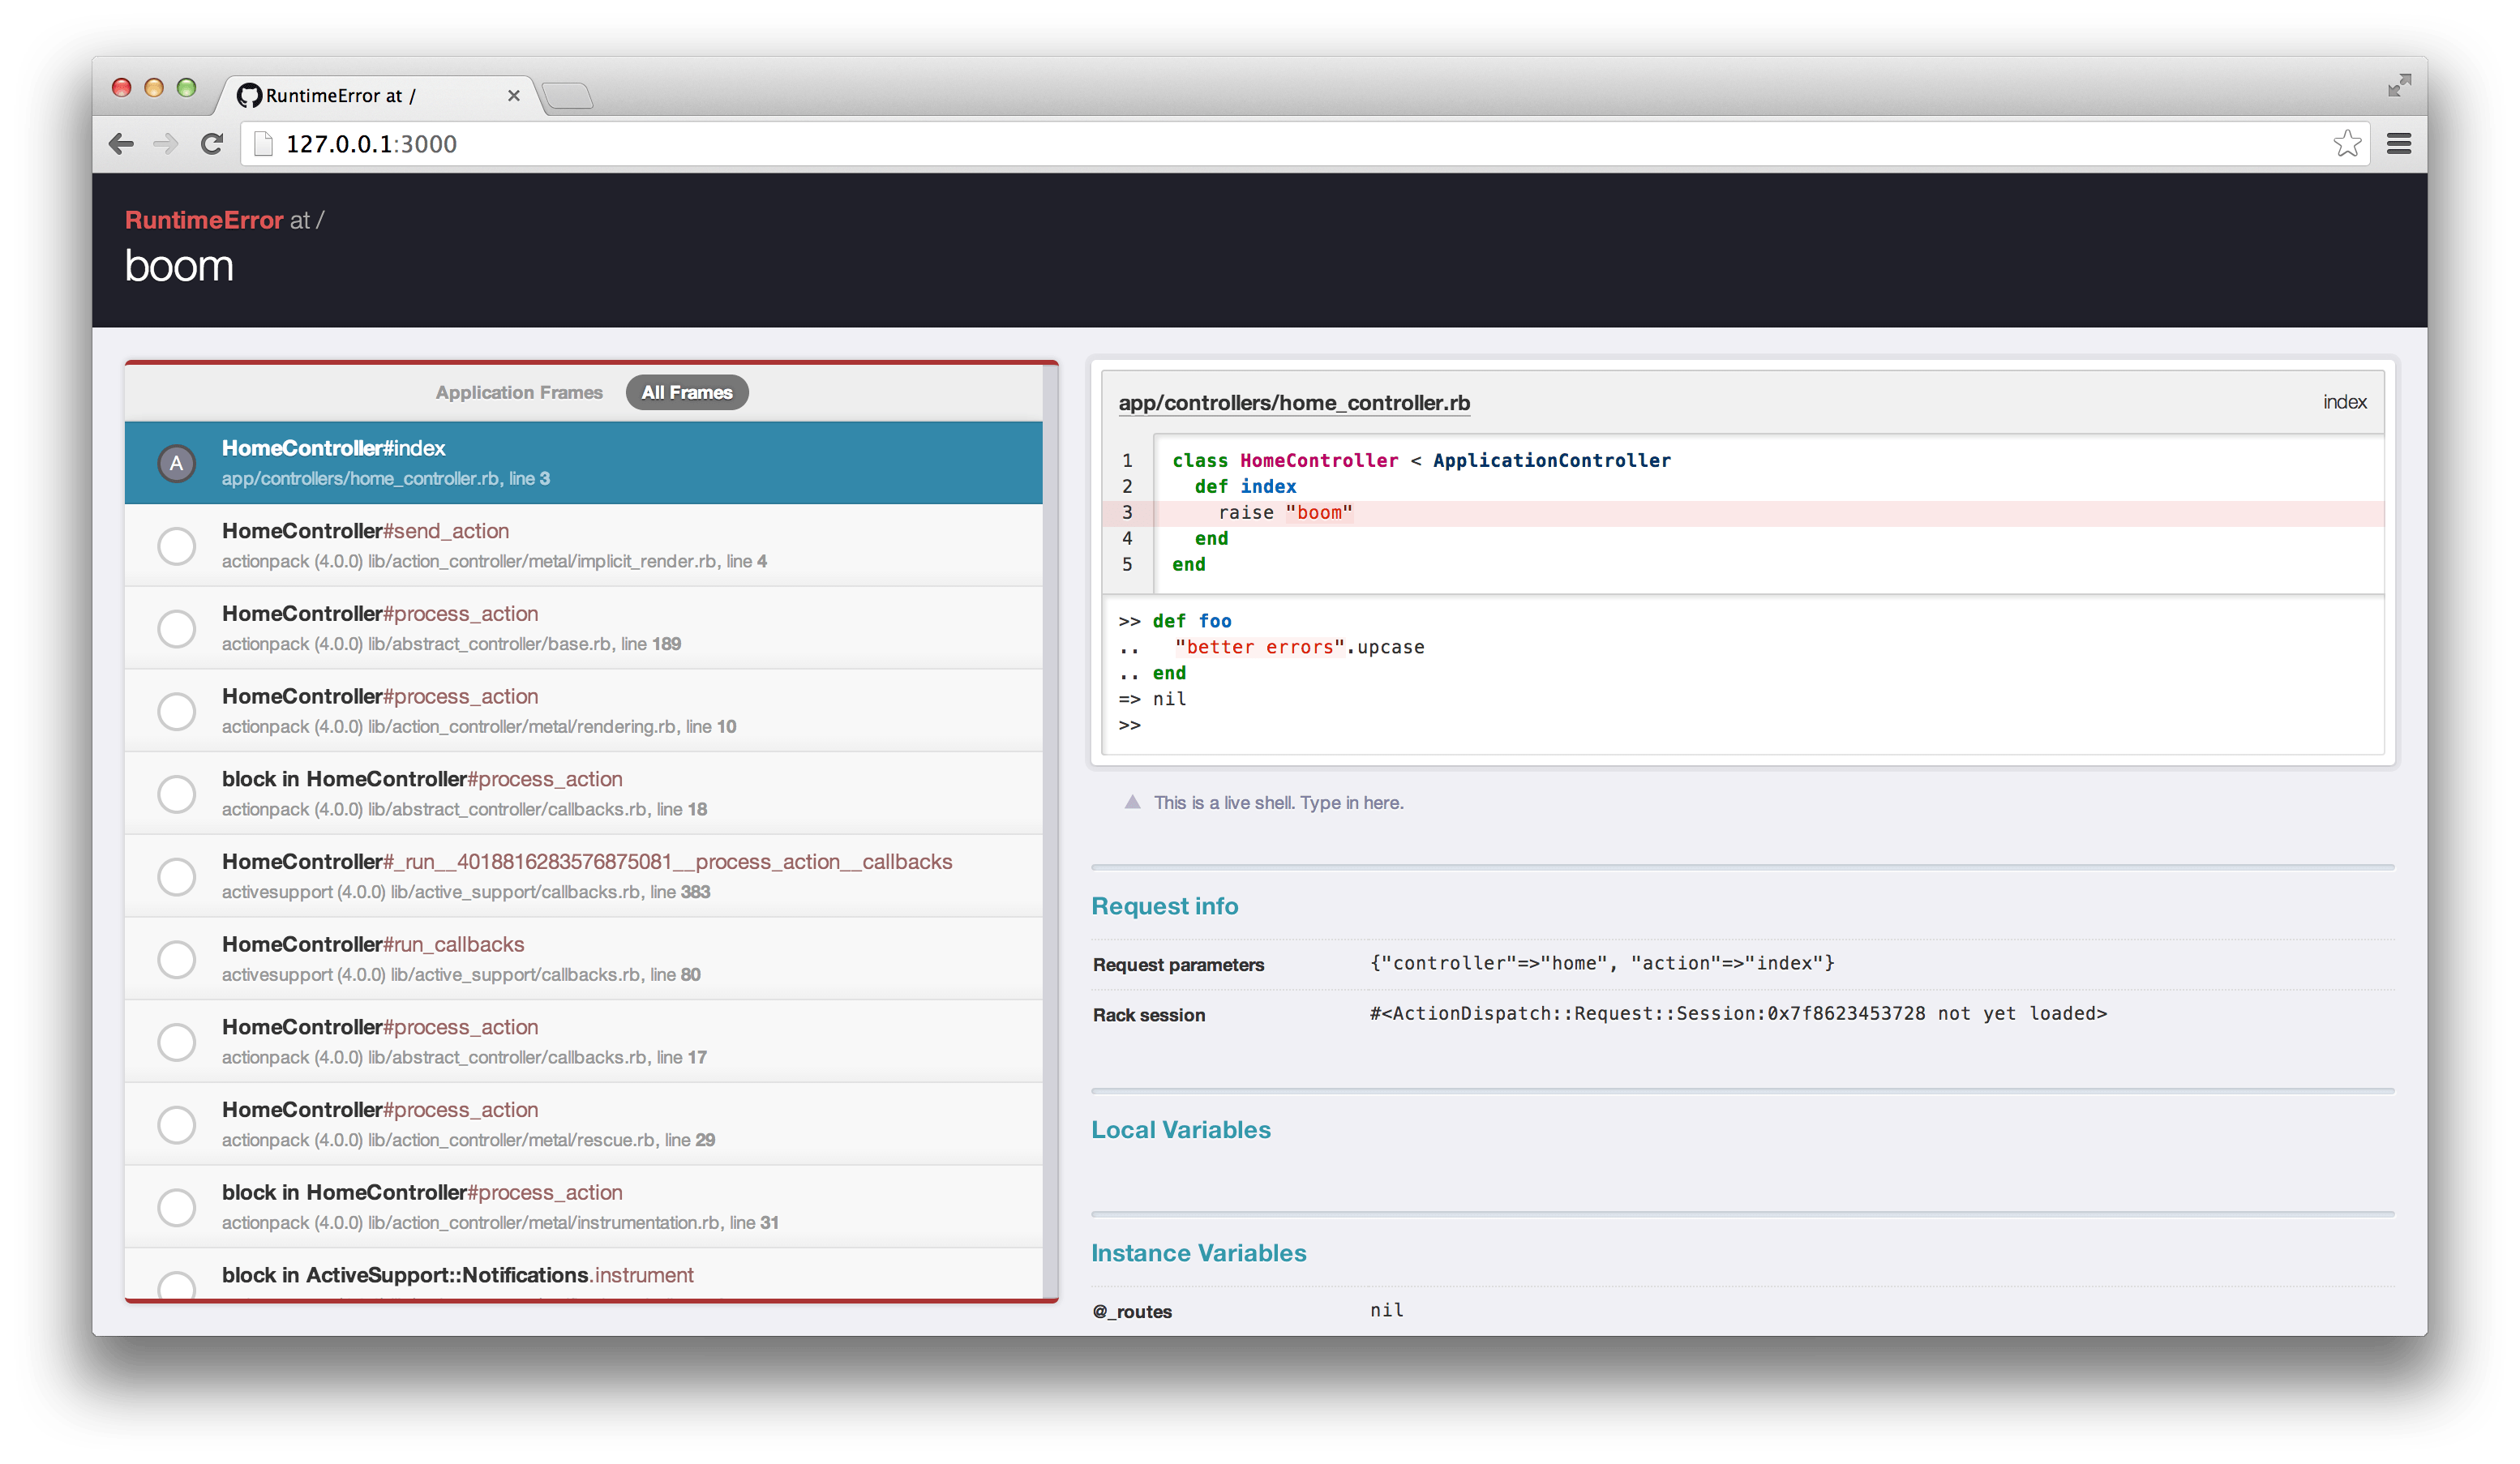
better_errors is the one gem I couldn't live without when developing in Rails.
better_errors replaces the standard Rails error page with a much better and
more useful error page. It looks like this:

The added features of better_errors are quite powerful and include (from the better_errors documentation):
- Full stack trace
- Source code inspection for all stack frames (with highlighting)
- Local and instance variable inspection
- Live REPL on every stack frame
The live REPL is of course the most powerful of these features and the one that I use the most. Anytime I am presented with an error page, I have instant access to a REPL where I can check out different variables and execute various bits of code.
The live REPL feature does not come as a default with better_errors. To get
the live REPL feature (and you definitely want to), you will also need to
include the binding_of_caller gem in your Gemfile. After doing so, your
Gemfile should include the following:
group :development do
  gem "better_errors"
  gem "binding_of_caller"
end
One trick I like to use with better_errors is to use raise params.inspect
in my controller actions in order to trigger a better_errors page.
As an example, let's say I want to figure out what's going on with the update
action in the UsersController. I could use a debugger or binding.pry
like I discussed previously, but I can also use raise params.inspect to
trigger the rendering of the better_errors page. The following code shows how.
class UsersController < ApplicationController
  def update
    raise params.inspect
  end
end
Then, once the update action is triggered, the browser will render the
corresponding better_errors page.
As with many of the other gems mentioned, there's a great RailsCast about better_errors that gives a good overview of how to best use the gem.
Conclusion
That covers some of my favorite gems to use during Rails development.
What are some of your favorites?